Blog | ytyng.comhttps://www.ytyng.com/blog/2024-07-27T10:36:56+00:00BlogMySQL でコレーションの違うフィールドで照合しようとして Range checked for each record が出た話2024-07-24T11:30:46+00:002024-07-27T09:37:52+00:00ytynghttps://www.ytyng.com/blog/author/ytyng/https://www.ytyng.com/blog/mysql-slow-query-but-indexed-range-checked-for-each-record/MySQL で、インデックスがあるフィールドに対してサブクエリをしているのにインデックスが効かなくて検索に膨大な時間がかかる問題が発生した。
`FORCE INDEX` で強制的にインデックスを使おうとしても適用されない。
`EXPLAIN` を見てみると、 `possible_keys` にインデックスが該当しているのに、 `key` は NULL になっていて、使われないことがわかる。
`rows` にはレコード全数が出ており、`EXTRA` には
```
Range checked for each record (index map: 0x10)
```
という見慣れないメッセージが出ていた。
改めてテーブル定義を確認したところ、 **フィールドのコレーション** が違っていた。
コレーションというか文字コードがそもそも違っていた。
utf8mb3 (COLLATE utf8mb3_general_ci ) と utf8mb4 ( COLLATE utf8mb4_bin ) を比較していた。
この要件の場合、そもそもインデックスを使って検索することはできない。
なので、片方のフィールドを `ALTER TABLE CHNAGE COLUMN` して合わせるしかない。はず。
今回は、ID系のフィールドなので `utf8mb3` に合わせました。
```
ALTER TABLE new_table
CHANGE COLUMN some_id some_id varchar(100) CHARACTER SET utf8mb3 COLLATE utf8mb3_general_ci NOT NULL,
CHANGE COLUMN next_some_id next_some_id varchar(100) CHARACTER SET utf8mb3 COLLATE utf8mb3_general_ci DEFAULT NULL;
```
ちなみに `utf8mb3` に合わせるのは将来性が無いため本来は良くない。デプリケーションウォーニングも出る。けど今回はしょうがなかった。
```
[HY000][1287] 'utf8mb3' is deprecated and will be removed in a future release. Please use utf8mb4 instead
[HY000][3778] 'utf8mb3_general_ci' is a collation of the deprecated character set UTF8MB3. Please consider using UTF8MB4 with an appropriate collation instead.
```
あと、本来であればコレーションは `utf8mb3_general_ci` より `utf8mb3_bin` のほうが効率的なんだろうと思うが、他のフィールドが `utf8mb3_general_ci` なので合わせた。プライベートな Git サブモジュールがあるプロジェクトを AWS Amplify にデプロイする方法2024-07-20T10:55:19+00:002024-07-27T06:38:23+00:00ytynghttps://www.ytyng.com/blog/author/ytyng/https://www.ytyng.com/blog/how-to-deploy-private-git-submodule-included-app-to-aws-amplify/以前書いた [プライベートな Git サブモジュールがあるプロジェクトを Vercel にデプロイする方法](https://www.ytyng.com/blog/how-to-deploy-project-to-vercel-includes-private-submodules/) の AWS Amplify 版。やっていることはほとんど同じです。
# 1. Fine-granted personal access token を作る
https://github.com/settings/tokens?type=beta
上記ページから、 Generate new token をクリック。
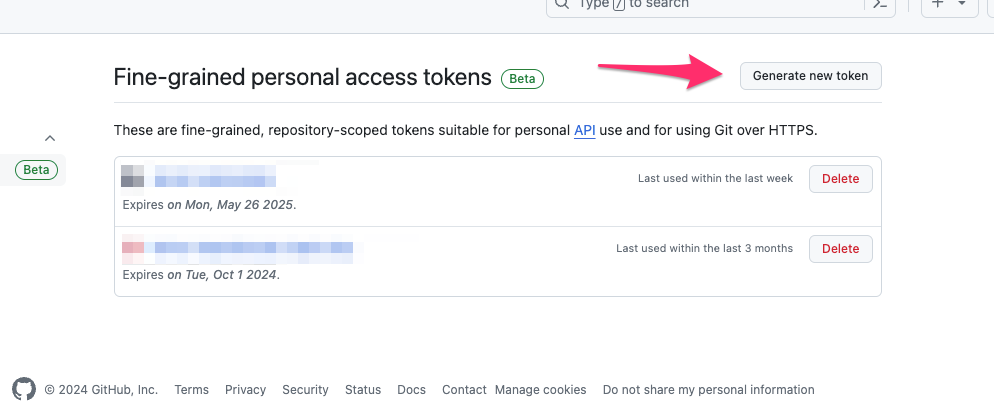
Repository access は、 Only select repositories を選択し、必要最低限のリポジトリを選択する。
Repository permissions は Contents の Read-only のみ付与する。

Generate token ボタンを押して生成する。
# 2. Amplify の環境変数に登録する
左メニューの「ホスティング」から「環境変数」を選択し、「変数を管理」を選択。
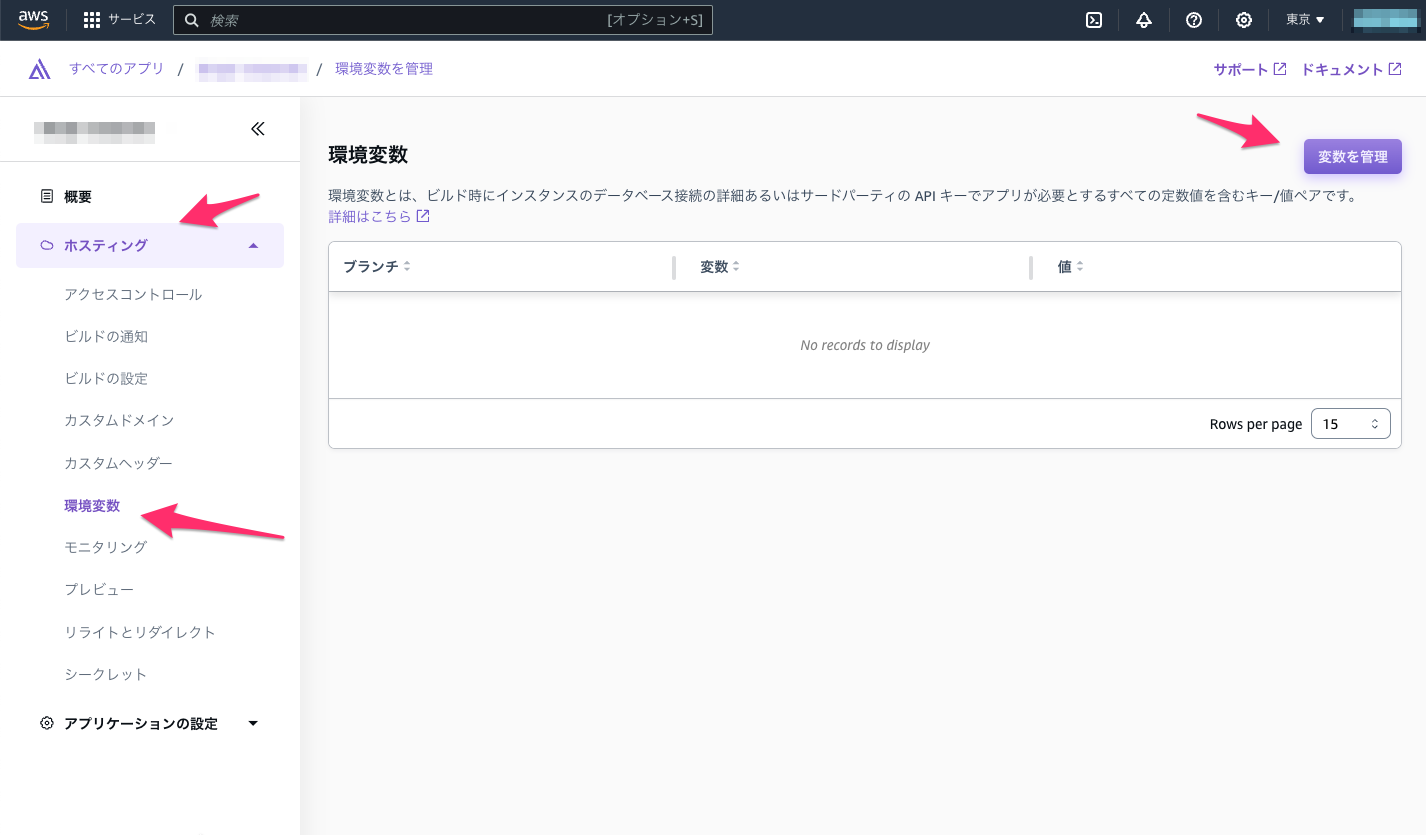
GITHUB_PAT という名前でトークンを追加する。

# 3. ビルドスクリプトを作る
sh/pre-build-for-amplify.sh という名前で作った。
```shell
#!/usr/bin/env bash
cd $(dirname $0)/../ || exit
if [ -z "${GITHUB_PAT}" ]; then
echo "環境変数 GITHUB_PAT が設定されていません。Github の Fine-grained トークンを再生成して、Amplify の環境変数 GITHUB_PAT に登録してください。"
echo "https://github.com/settings/tokens?type=beta"
echo "https://ap-northeast-1.console.aws.amazon.com/amplify/apps/"
exit 1
fi
echo "サブモジュールの更新に失敗する場合は、Github の Fine-grained トークンを再生成して、Amplify の環境変数 GITHUB_PAT に登録してください。"
echo "https://github.com/settings/tokens?type=beta"
echo "https://ap-northeast-1.console.aws.amazon.com/amplify/apps/"
git submodule set-url <my-submodule> "https://${GITHUB_PAT}@github.com/ytyng/<my-submodule>.git"
git submodule sync
git submodule update --init
```
# 4. Amplify でこのビルドスクリプトを使ってビルドするようにする
Amplify のページのホスティング → ビルドの設定 のページで、ブラウザで amplify.yml を修正するか、プロジェクトのルートディレクトリに amplify.yml を配置する。
`preBuild.commands` に `sh/pre-build-for-amplify.sh` を追加する。
```yaml
version: 1
frontend:
phases:
preBuild:
commands:
- 'sh/pre-build-for-amplify.sh' # これを追加
- 'npm ci --cache .npm --prefer-offline'
build:
commands:
- 'npm run build'
artifacts:
baseDirectory: build
files:
- '**/*'
cache:
paths:
- '.npm/**/*'
```</my-submodule></my-submodule>Python の スレッド並列とプロセス並列の処理コードの雛形2024-07-03T00:23:14+00:002024-07-26T11:01:59+00:00ytynghttps://www.ytyng.com/blog/author/ytyng/https://www.ytyng.com/blog/python-parallel-processing-by-thread-or-process/違いとしては ThreadPoolExecutor を使うか ProcessPoolExecutor を使うかの違いのみ。
# スレッド並列
## コード
```python
from concurrent.futures import ThreadPoolExecutor
import time
import uuid
_uuid = str(uuid.uuid4())
print(f'Code evaluated. uuid={_uuid}')
def task(a, *, b):
print(f'Task {a} started')
time.sleep(2)
print(f'Task {a} completed')
return f'worker result({a}) = {a * b}, uuid = {_uuid}'
def main():
_task_args = range(10)
workers = []
with ThreadPoolExecutor(max_workers=3) as executor:
for _task_arg in _task_args:
print(f'Worker append task {_task_arg}')
# タスクを追加すると共に逐次実行する
workers.append(
executor.submit(
task, _task_arg, b=_task_arg+1
)
)
# 全てのタスクが完了したらここに来る
print('Contextmanager exited.')
for worker in workers:
print('Worker result:', worker.result())
if __name__ == '__main__':
main()
```
## 結果
```
Code evaluated. uuid=e7fe32bc-83d6-4b14-ba07-e0b7b410f8eb
Worker append task 0
Task 0 startedWorker append task 1
Task 1 started
Worker append task 2
Task 2 started
Worker append task 3
Worker append task 4
Worker append task 5
Worker append task 6
Worker append task 7
Worker append task 8
Worker append task 9
Task 2 completed
Task 3 started
Task 0 completed
Task 4 started
Task 1 completed
Task 5 started
Task 3 completed
Task 6 started
Task 4 completed
Task 5 completed
Task 7 started
Task 8 started
Task 6 completed
Task 9 started
Task 7 completed
Task 8 completed
Task 9 completed
Contextmanager exited.
Worker result: worker result(0) = 0, uuid = e7fe32bc-83d6-4b14-ba07-e0b7b410f8eb
Worker result: worker result(1) = 2, uuid = e7fe32bc-83d6-4b14-ba07-e0b7b410f8eb
Worker result: worker result(2) = 6, uuid = e7fe32bc-83d6-4b14-ba07-e0b7b410f8eb
Worker result: worker result(3) = 12, uuid = e7fe32bc-83d6-4b14-ba07-e0b7b410f8eb
Worker result: worker result(4) = 20, uuid = e7fe32bc-83d6-4b14-ba07-e0b7b410f8eb
Worker result: worker result(5) = 30, uuid = e7fe32bc-83d6-4b14-ba07-e0b7b410f8eb
Worker result: worker result(6) = 42, uuid = e7fe32bc-83d6-4b14-ba07-e0b7b410f8eb
Worker result: worker result(7) = 56, uuid = e7fe32bc-83d6-4b14-ba07-e0b7b410f8eb
Worker result: worker result(8) = 72, uuid = e7fe32bc-83d6-4b14-ba07-e0b7b410f8eb
Worker result: worker result(9) = 90, uuid = e7fe32bc-83d6-4b14-ba07-e0b7b410f8eb
```
# プロセス並列
## コード
```python
from concurrent.futures import ProcessPoolExecutor
import uuid
import time
_uuid = str(uuid.uuid4())
print(f'Code evaluated. uuid={_uuid}')
def task(a, *, b):
print(f'Task {a} started')
time.sleep(2)
print(f'Task {a} completed')
return f'worker result({a}) = {a * b}, uuid = {_uuid}'
def main():
_task_args = range(10)
workers = []
with ProcessPoolExecutor(max_workers=3) as executor:
for _task_arg in _task_args:
print(f'Worker append task {_task_arg}')
# タスクを追加すると共に逐次実行する
workers.append(
executor.submit(
task, _task_arg, b=_task_arg+1
)
)
# 全てのタスクが完了したらここに来る
print('Contextmanager exited.')
for worker in workers:
print('Worker result:', worker.result())
if __name__ == '__main__':
main()
```
## 結果
```
Code evaluated. uuid=036d3d4f-52df-4a56-a2f3-e965496887ff
Worker append task 0
Worker append task 1
Worker append task 2
Worker append task 3
Worker append task 4
Worker append task 5
Worker append task 6
Worker append task 7
Worker append task 8
Worker append task 9
Code evaluated. uuid=9341bfa9-3851-4ba0-bfaf-189eb9a438fe
Code evaluated. uuid=7b9c1dbb-bcd8-4c79-bf4b-75f2178f2bf4
Task 0 started
Task 1 started
Code evaluated. uuid=cab23013-d3c1-4520-851a-172cdcfaacf6
Task 2 started
Task 0 completed
Task 3 started
Task 2 completedTask 1 completed
Task 4 started
Task 5 started
Task 3 completed
Task 6 started
Task 5 completed
Task 7 started
Task 4 completed
Task 8 started
Task 8 completed
Task 9 started
Task 6 completed
Task 7 completed
Task 9 completed
Contextmanager exited.
Worker result: worker result(0) = 0, uuid = 9341bfa9-3851-4ba0-bfaf-189eb9a438fe
Worker result: worker result(1) = 2, uuid = 7b9c1dbb-bcd8-4c79-bf4b-75f2178f2bf4
Worker result: worker result(2) = 6, uuid = cab23013-d3c1-4520-851a-172cdcfaacf6
Worker result: worker result(3) = 12, uuid = 9341bfa9-3851-4ba0-bfaf-189eb9a438fe
Worker result: worker result(4) = 20, uuid = cab23013-d3c1-4520-851a-172cdcfaacf6
Worker result: worker result(5) = 30, uuid = 7b9c1dbb-bcd8-4c79-bf4b-75f2178f2bf4
Worker result: worker result(6) = 42, uuid = 9341bfa9-3851-4ba0-bfaf-189eb9a438fe
Worker result: worker result(7) = 56, uuid = 7b9c1dbb-bcd8-4c79-bf4b-75f2178f2bf4
Worker result: worker result(8) = 72, uuid = cab23013-d3c1-4520-851a-172cdcfaacf6
Worker result: worker result(9) = 90, uuid = cab23013-d3c1-4520-851a-172cdcfaacf6
```
ポイントとして、ProcessPoolExecutor を使った場合、コードの評価は max_workers 分行われ、その後は使い回されます。
処理ごとに新たに評価されるわけではありません。Next で、入稿された生HTMLテンプレートをSSRで動的に機能追加して出力する2024-06-16T09:28:46+00:002024-07-27T08:22:50+00:00ytynghttps://www.ytyng.com/blog/author/ytyng/https://www.ytyng.com/blog/react-next-client-submission-dynamic-ssr/クライアント入稿されたHTMLに、一部サーバーサイドで動的に変更する要件を、Next で対応するチュートリアルです。
今回のプロジェクトの結果は Github で公開しています。
https://github.com/ytyng/my-customer-submission
デプロイしたサイト: https://my-customer-submission.ytyng.com/
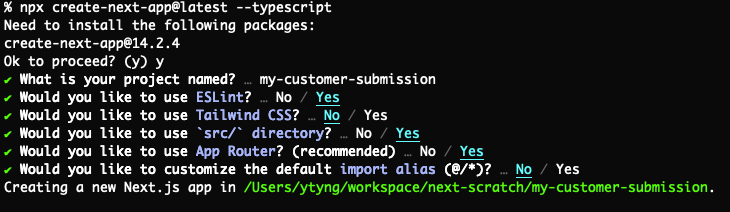
# Next の環境構築
```shell
npx create-next-app@latest --typescript
```
次のように選択していきます。
- project name: my-customer-submission
- Would you like to use ESLint: Yes
- Would you like to use Tailwind CSS?: No
- Would you like to use `src/` directory?: Yes
- Would you like to use App Router? (recommended): Yes
- Would you like to customize the default import alias: Yes
## 動作確認
```shell
cd my-customer-submission
npm run dev
```

# 入稿HTML の追加
`src/templates` フォルダを作って、入稿されたHTMLを入れます。
CSS は Bootstrap CDN と手書きの CSS を使っているものとします。
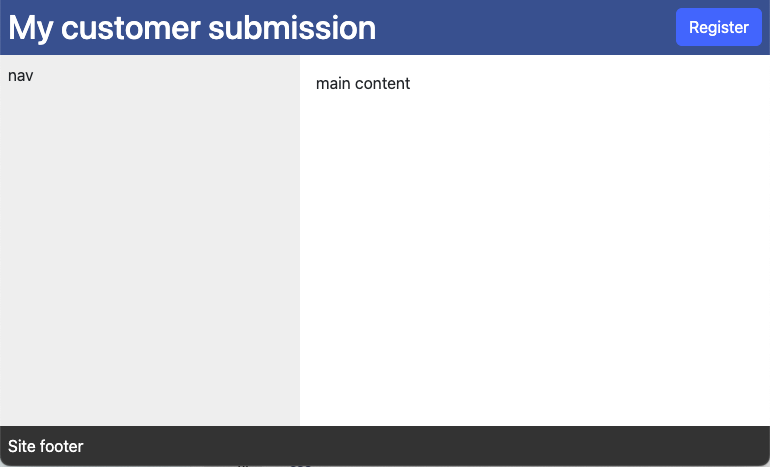
## src/templates/index.html
```html
<html lang="ja">
<head>
<meta charset="utf-8"/>
<title>My customer submission</title>
<link crossorigin="anonymous" href="https://cdn.jsdelivr.net/npm/bootstrap@5.3.0/dist/css/bootstrap.min.css" integrity="sha384-9ndCyUaIbzAi2FUVXJi0CjmCapSmO7SnpJef0486qhLnuZ2cdeRhO02iuK6FUUVM" rel="stylesheet"/>
<link href="./css/site.css" rel="stylesheet"/>
</head>
<body class="d-flex flex-column h-100">
<header class="site-header d-flex align-items-center">
<h1 class="flex-grow-1 m-0 p-2">My customer submission</h1>
<div>
<button class="btn btn-primary m-2" id="register-button">Register</button>
</div>
</header>
<div class="flex-grow-1 d-flex" id="center-row">
<nav class="site-nav p-2">
nav
</nav>
<main class="flex-grow-1">
<div class="p-3" id="main-content">
main content
</div>
</main>
</div>
<footer class="site-footer p-2">
Site footer
</footer>
<script src="./js/site.js"></script>
</body>
</html>
```
## src/templates/css/site.css
```css
.site-header {
background-color: #2b538f;
color: white;
}
.site-nav {
background-color: #eee;
width: 300px;
}
.site-footer {
background-color: #333;
color: white;
}
```
## src/templates/js/site.js
```js
document.querySelector('#register-button').addEventListener('click', function() {
alert('Hello World!');
})
```
# 方針
入稿 HTML ファイルから、 `body` の中身だけを抜き出して React のコンポーネントにし、`id="main-content"` のHTMLエレメントを別の React エレメントに差し替えます。
入稿 HTML ファイルには `head` タグがありますが、今回はこれは使わずに独自で head の内容を作ります。
head の内容をパースして使う方法もあると思いますが、今回は行わず、例えば BootStrap を CDN から読み込んでいる箇所は、コピペで `<link/>`` タグを作ります。
ブラウザJSがあります。右上の「Register」ボタンを押した時のアクションが登録されています。
これは public 内にそのままコピーしてクライアントに返します。
# ライブラリの準備
## html-react-parser のインストール
HTMLをパースして使うにあたり、`html-react-parser` を使います。
```shell
npm install html-react-parser -D
```
# コンポーネントの追加
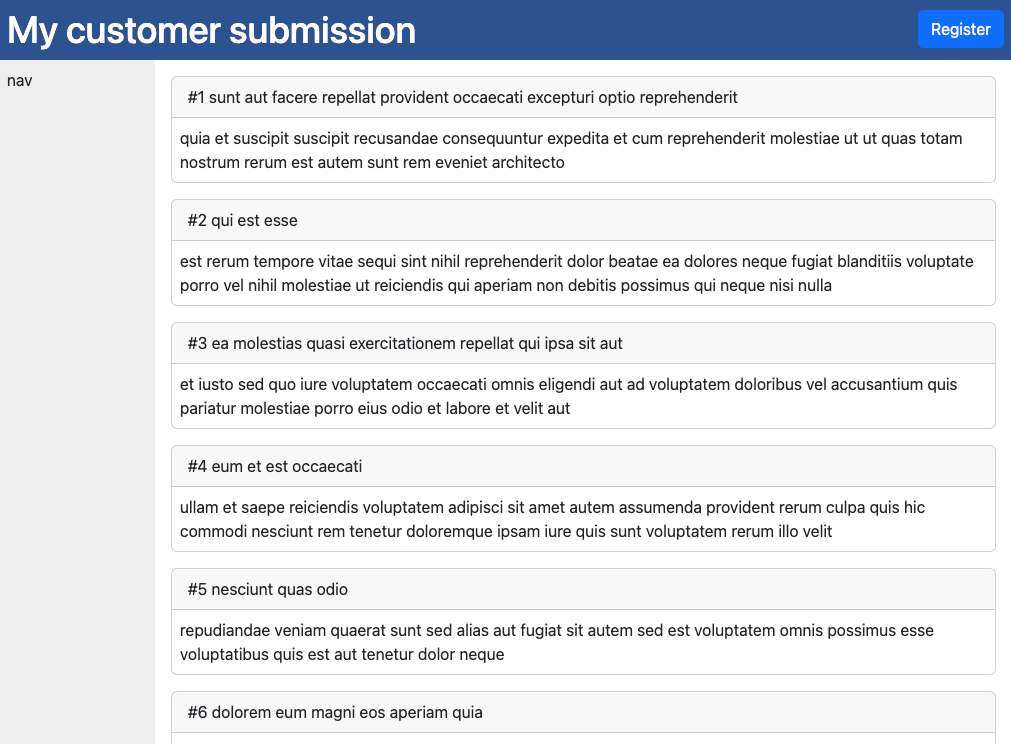
[JSONPlaceholder](https://jsonplaceholder.typicode.com) の [posts](https://jsonplaceholder.typicode.com/posts)
を取得して、 Bootstrap の Card コンポーネントで表示する React コンポーネントを作ります。
## src/app/interfaces/posts.ts
```ts
export interface PostData {
userId: number
id: number
title: string
body: string
}
```
## src/app/components/PostCard.tsx
```tsx
import {PostData} from '@/app/interfaces/posts'
/**
* ポストのカード1枚を表すコンポーネント
*/
export default async function Component({postData}: {postData: PostData}) {
return (
<div classname="{'card" mx-3'}="" my-3="">
<div classname="{'card-header'}">
#{postData.id} {postData.title}
</div>
<div classname="{'card-body" p-2'}="">
<div>{postData.body}</div>
</div>
</div>
)
}
```
## src/app/components/PostCards.tsx
```tsx
import {PostData} from '@/app/interfaces/posts'
import PostCard from './PostCard'
async function getPosts(): Promise<postdata[]> {
const res = await fetch('https://jsonplaceholder.typicode.com/posts')
return await res.json()
}
/**
* ポストのカード複数枚を fetch してから表示するコンポーネント
*/
export default async function Component() {
const posts = await getPosts()
return posts.map((post: any) => (
<postcard key="{post.id}/" postdata="{post}">
));
}
```
# layout.tsx の修正
`layout.tsx` で `html`, `head`, `body` の HTML エレメントを返すようにします。
テンプレートの css はここで import しています。
今回は、link タグなどは 入稿HTMLからパースせず、tsx にハードコーディングしました。
`head` 内の `link` タグや `body` のクラス名は、二重管理になってしまっていますのであまり良くありませんが、
どのような方針が良いかは入稿 HTML の修正頻度やプロジェクトの方針次第になると思います。
## src/app/layout.tsx
```tsx
import type { Metadata } from "next";
import "../templates/css/site.css"
export const metadata: Metadata = {
title: "My customer submission",
};
export default function RootLayout({
children,
}: Readonly<{
children: React.ReactNode;
}>) {
return (
<html classname="{'h-100'}" lang="ja">
<head>
<link crossorigin="anonymous" href="https://cdn.jsdelivr.net/npm/bootstrap@5.3.0/dist/css/bootstrap.min.css" integrity="sha384-9ndCyUaIbzAi2FUVXJi0CjmCapSmO7SnpJef0486qhLnuZ2cdeRhO02iuK6FUUVM" rel="stylesheet">
</link></head>
<body classname="{'d-flex" flex-column="" h-100'}="">{children}</body>
</html>
);
}
```
# page.tsx の修正
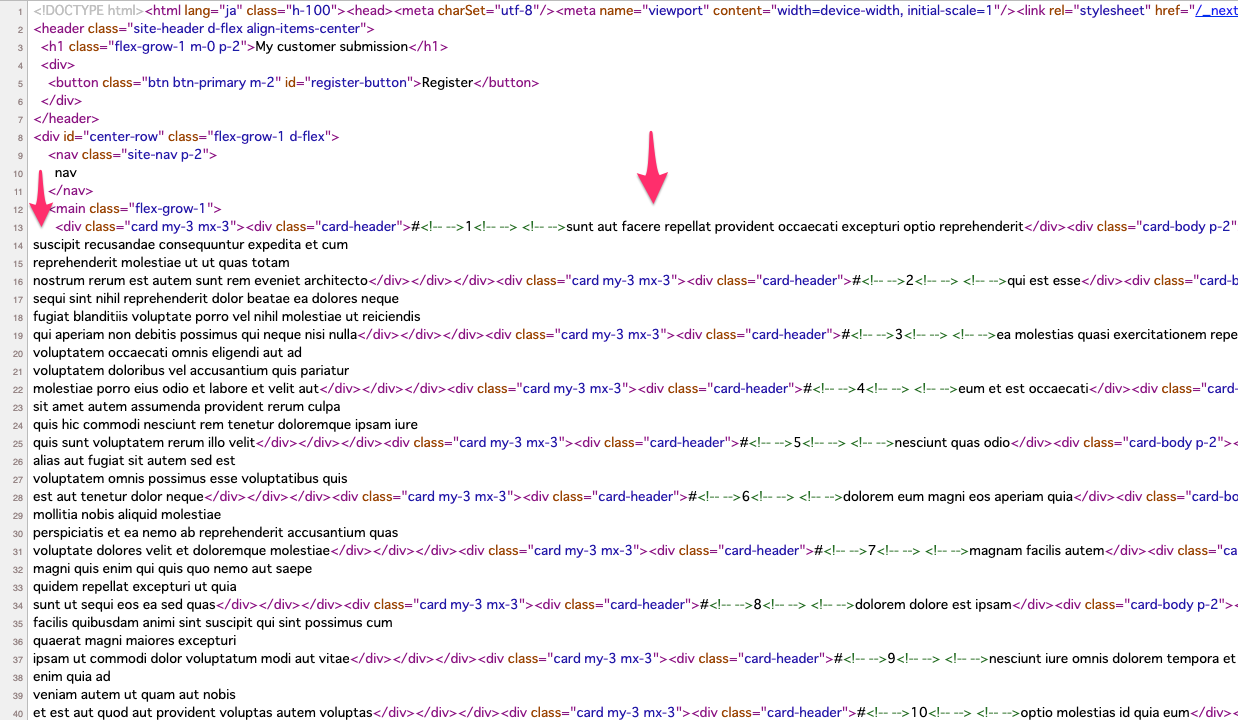
入稿HTML を読み込み、正規表現で `body` の中だけを抽出して html-react-parser でパースします。
そして、 `<div id="main-content"></div>` を、`PostCards` コンポーネントに差し替えます。
## src/app/page.tsx
```
'use server'
import fs from 'fs'
import parse from 'html-react-parser'
import PostCards from '@/app/components/PostCards'
/**
* ファイルの内容をテキストとして取得
*/
async function loadHtmlFile(filePath: string) {
return fs.promises.readFile(filePath, 'utf8')
}
/**
* HTMLのbodyタグの中身を取得
*/
function extractBodyContent(html: string) : string {
const match = /<body[^>]*?>([\s\S]*)<\/body>/.exec(html)
return match ? match[1] : html
}
/**
* テンプレート内の <div id="main-content"> を PostCards に置き換える
*/
function replaceElement(domNode: any, index: number) {
if (domNode.type === "tag" && domNode.name === "div" && domNode.attribs.id === "main-content") {
return (
<postcards></postcards>
)
}
}
/**
* テンプレートHTML の Body を JSX.Element として取得
*/
async function getInnerBodyElement() {
const htmlTemplatePath = "src/templates/index.html"
const htmlTemplate = await loadHtmlFile(htmlTemplatePath)
const innerBodyHTML = extractBodyContent(htmlTemplate)
return parse(innerBodyHTML, {replace: replaceElement})
}
export default async function Home() {
return await getInnerBodyElement()
}
```
# JSファイルのコピー
入稿された ブラウザJSは、`public/js/` 内にコピーします。
# 動作確認
できました。
デプロイしたサイト: https://my-customer-submission.ytyng.com/
生成されたHTMLソースを見ると、SSRできていることが確認できます。
</div></body[^></postcard></postdata[]>Svelte で SSR するDocker イメージを作る2024-06-15T11:03:46+00:002024-07-27T08:49:49+00:00ytynghttps://www.ytyng.com/blog/author/ytyng/https://www.ytyng.com/blog/svelte-build-ssr-app-docker-image/SvelteKit を使い、サーバーサイドでほかのAPIサーバーからデータを取得して、HTMLをレンダリングして返すプログラムを作り、Docker イメージにします。
# Svelte のセットアップ
https://kit.svelte.jp/docs/creating-a-project
```shell
npm create svelte@latest my-ssr-app
```
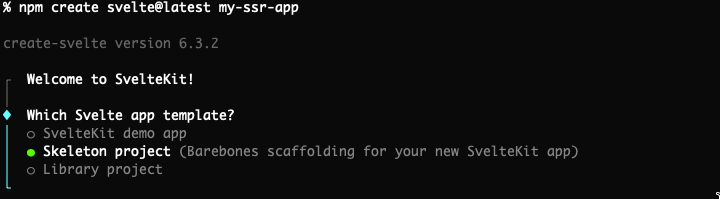
`Skeleton project` を選択
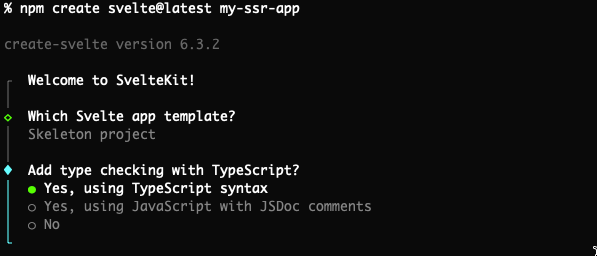
`Yes, using TypeScript syntax` を選択
オプションを好みで選択
```
Next steps:
1: cd my-ssr-app
2: npm install
3: git init && git add -A && git commit -m "Initial commit" (optional)
4: npm run dev -- --open
```
書いてあるとおりに実行
asdf を使う場合は `.tool-versions` を作っておく
```shell
echo 'nodejs 20.10.0' > my-ssr-app/.tool-versions
```
テスト実行
```shell
npm run dev -- --open
```
# コードを書く
src/routes の下にファイルを書きます。
## src/routes/+page.server.ts の作成
[JSON Placeholder](https://jsonplaceholder.typicode.com/) より、ダミーデータを取得しています。
### src/routes/+page.server.ts
```ts
export async function load() {
const res = await fetch('https://jsonplaceholder.typicode.com/posts/1')
if (!res.ok) {
throw new Error('Failed to fetch data')
}
return {
postEntry: await res.json()
};
}
```
## src/routes/+page.svelte の修正
先ほどサーバーサイドで取得したデータを使うようにします
### src/routes/+page.svelte
```svelte
<script lang="ts">
export let data;
const postEntry = data.postEntry
</script>
<h1>Post #1</h1>
<div>
<h2>{postEntry.title}</h2>
<p>{postEntry.body}</p>
</div>
```
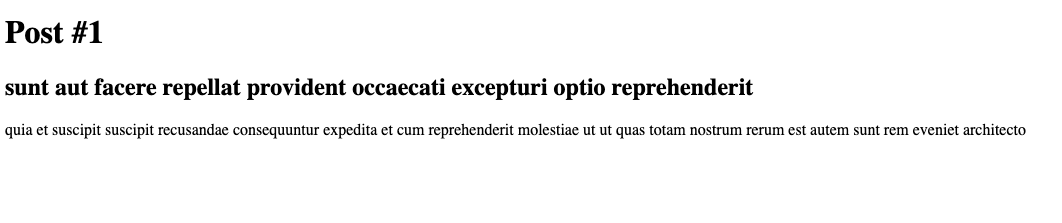
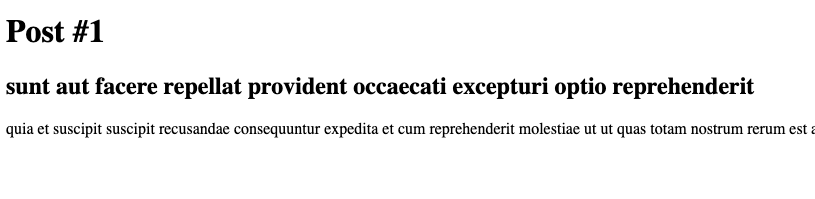
## 動作確認
生成されたHTMLを見てみると、SSR されていることがわかります。

# node 用のビルド環境を整える
https://kit.svelte.jp/docs/adapter-node
```shell
npm i -D @sveltejs/adapter-node
```
svelte.config.js の変更
```
import adapter from '@sveltejs/adapter-auto';
```
↓
```
import adapter from '@sveltejs/adapter-node';
```
## ビルド
```
npm run build
```
## 成果物の動作確認
```
cd build
node ./
```
```
Listening on 0.0.0.0:3000
```
と表示されるので、ブラウザで http://127.0.0.1:3000 を見る
# Dockerfile を書く
## Dockerfile
```dockerfile
FROM node:bookworm-slim
COPY ./build /app
COPY ./package.json /app/
WORKDIR /app
EXPOSE 3000
CMD ["node", "./"]
```
# Dockerイメージのビルド
```
docker build . -t my-ssr-app:latest
```
# 実行
```
docker run -p 3000:3000 my-ssr-app
```
```
Listening on 0.0.0.0:3000
```
と表示されるので、ブラウザで http://127.0.0.1:3000 を見る
Ubuntu Linux に Google Chrome For Testing とchromedriver をインストールする2024-06-13T03:09:21+00:002024-07-27T10:26:08+00:00ytynghttps://www.ytyng.com/blog/author/ytyng/https://www.ytyng.com/blog/install-chromedriver-126-on-ubuntu-22/Ubuntu 22 に Google Chrome For Testing 126 と chromedriver 126 をインストールしたメモです。
# 補足
通常は、この手順を行うより、Docker の Standalone Chrome ( Selenium Grid )を使うのが楽でおすすめです。
https://hub.docker.com/r/selenium/standalone-chrome/tags
ただ、Docker が使えない環境下であったり、ファイルダウンロードについて特殊な要求がある場合等はうまくいかない場合があります。
# 手順
## apt で google-chrome-stable がインストールされていたらアンインストールする。
```shell
dpkg --get-selections | grep google-chrome-stable
sudo dpkg --purge google-chrome-stable
```
## chrome for testing のリリース状況を確認する
下記ページを見る
https://googlechromelabs.github.io/chrome-for-testing/
## ダウンロード
Linux で
```shell
cd /tmp
curl -O "https://storage.googleapis.com/chrome-for-testing-public/126.0.6478.55/linux64/chrome-linux64.zip"
curl -O "https://storage.googleapis.com/chrome-for-testing-public/126.0.6478.55/linux64/chromedriver-linux64.zip"
```
## 展開
```shell
unzip chrome-linux64.zip
unzip chromedriver-linux64.zip
```
`-d` オプションは無くて大丈夫
## 移動
```shell
sudo mv /tmp/chromedriver-linux64/chromedriver /usr/local/bin/
sudo mv /tmp/chrome-linux64 /usr/local/bin/
sudo ln -s /usr/local/bin/chrome-linux64/chrome /usr/local/bin/google-chrome
```
## Chrome 動作確認
```shell
cd /tmp
google-chrome --headless --disable-gpu --screenshot https://www.example.com/
imgcat screenshot.png
```
## chromedriver 動作確認
```shell
chromedriver --verbsose & curl -d '{ "desiredCapabilities": {"browserName": "chrome", "chromeOptions": {"args": [ "--headless" ]} }}' http://127.0.0.1:9515/session
```
### 結果
```
Starting ChromeDriver 126.0.6478.55 (7616ff175414646cbd1ac65e912fc530b19cc573-refs/branch-heads/6478@{#1402}) on port 9515
Only local connections are allowed.
Please see https://chromedriver.chromium.org/security-considerations for suggestions on keeping ChromeDriver safe.
ChromeDriver was started successfully.
{"sessionId":"463314578b16e8b2d57efc572a6fa6b8","status":0,"value":{"acceptInsecureCerts":false,"acceptSslCerts":false,"browserConnectionEnabled":false,"browserName":"chrome-headless-shell","chrome":{"chromedriverVersion":"126.0.6478.55 (7616ff175414646cbd1ac65e912fc530b19cc573-refs/branch-heads/6478@{#1402})","userDataDir":"/tmp/.org.chromium.Chromium.RjvIex"},"cssSelectorsEnabled":true,"databaseEnabled":false,"fedcm:accounts":true,"goog:chromeOptions":{"debuggerAddress":"localhost:34017"},"handlesAlerts":true,"hasTouchScreen":false,"javascriptEnabled":true,"locationContextEnabled":true,"mobileEmulationEnabled":false,"nativeEvents":true,"networkConnectionEnabled":false,"pageLoadStrategy":"normal","platform":"Linux","proxy":{},"rotatable":false,"setWindowRect":true,"strictFileInteractability":false,"takesHeapSnapshot":true,"takesScreenshot":true,"timeouts":{"implicit":0,"pageLoad":300000,"script":30000},"unexpectedAlertBehaviour":"ignore","version":"126.0.6478.55","webStorageEnabled":true,"webauthn:extension:credBlob":true,"webauthn:extension:largeBlob":true,"webauthn:extension:minPinLength":true,"webauthn:extension:prf":true,"webauthn:virtualAuthenticators":true}}
```プライベートな Git サブモジュールがあるプロジェクトを Vercel にデプロイする方法2024-05-26T15:38:40+00:002024-07-27T10:09:08+00:00ytynghttps://www.ytyng.com/blog/author/ytyng/https://www.ytyng.com/blog/how-to-deploy-project-to-vercel-includes-private-submodules/Vercel のビルド時は、プライベートリポジトリとなっているサブモジュールを取得できない。
Github上の Vercel のアプリに権限を付与してもできない。
Fine-granted personal access token を使って HTTP で取得させる必要がある。
キモとしては、ビルド中に下記を行う。
```shell
git submodule set-url <my-submodule> "https://${GITHUB_PAT}@github.com/ytyng/<my-submodule>.git"
git submodule sync
git submodule update --init
```
## 1. Fine-granted personal access token を作る
https://github.com/settings/tokens?type=beta
上記ページから、 Generate new token をクリック。

Repository access は、 Only select repositories を選択し、必要最低限のリポジトリを選択する。
Repository permissions は Contents の Read-only のみ付与する。

Generate token ボタンを押して生成する。
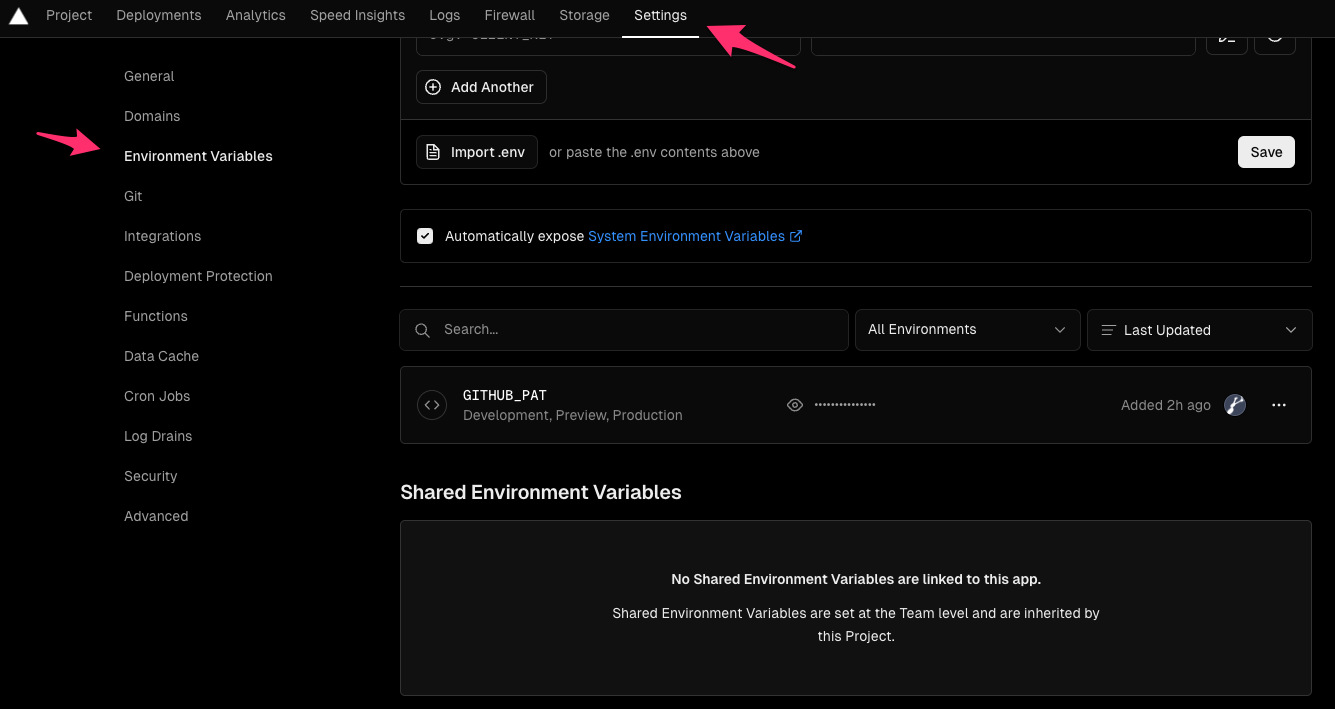
## 2. Vercel の環境変数に登録する
Vercel のプロジェクトの Settings → Environment Variables に登録する。私は GITHUB_PAT という名前で登録した。
## 3. ビルドスクリプトを作る
`sh/build-for-vercel.sh` という名前で作った。
```shell
#!/usr/bin/env bash
cd $(dirname $0)/../ || exit
if [ -z "${GITHUB_PAT}" ]; then
echo "環境変数 GITHUB_PAT が設定されていません。Github の vercel-submodule トークンを再生成して、Vercel の環境変数 GITHUB_PAT に登録してください。"
echo "https://github.com/settings/tokens?type=beta"
echo "https://vercel.com/<my-own-projects>/<project-name>/settings/environment-variables"
exit 1
fi
echo "サブモジュールの更新に失敗する場合は、Github の vercel-submodule トークンを再生成して、Vercel の環境変数 GITHUB_PAT に登録してください。"
echo "https://github.com/settings/tokens?type=beta"
echo "https://vercel.com/<my-own-projects>/<project-name>/settings/environment-variables"
git submodule set-url <my-submodule> "https://${GITHUB_PAT}@github.com/ytyng/<my-submodule>.git"
git submodule sync
git submodule update --init
# 本来のビルドスクリプト
npm run generate
```
## 4. vercel.json を書く
今回は Nuxt の静的コンテンツ生成なのでこのような形になる
```
{
"buildCommand": "sh/build-for-vercel.sh",
"outputDirectory": ".output/public"
}
```
# 注意
ビルドの最初で、どうしても
```
Warning: Failed to fetch one or more git submodules
```
の警告が出てしまうが、気にしない。

# 補足
submodule update ではなくクローンしなおしても動く。
```
rm -r <my-submodule>
git clone --depth 1 --branch main "https://${GITHUB_PAT}@github.com/ytyng/<my-submodule>.git" <my-submodule>
```</my-submodule></my-submodule></my-submodule></my-submodule></my-submodule></project-name></my-own-projects></project-name></my-own-projects></my-submodule></my-submodule>AWS EKS の Ingress で ALB を使う時、 www 無しのリクエストを www 有りにリダイレクトさせるマニフェスト2024-05-20T11:20:05+00:002024-07-27T00:57:32+00:00ytynghttps://www.ytyng.com/blog/author/ytyng/https://www.ytyng.com/blog/aws-eks-ingress-no-www-url-redirect-to-www/www 無しのリクエストに対して、www有りのURL へのレスポンスを返すだけの Ingress のマニフェストです。
```yaml
apiVersion: networking.k8s.io/v1
kind: Ingress
metadata:
name: no-www-ytyng-com-ingress
namespace: ytyng
labels:
app: my-k8s-alb
annotations:
alb.ingress.kubernetes.io/actions.redirect-to-eks: >
{"type": "redirect", "redirectConfig": {"host": "www.ytyng.com", "path": "/", "protocol": "HTTPS", "port":"443", "query": "", "statusCode": "HTTP_301"}}
alb.ingress.kubernetes.io/scheme: internet-facing
alb.ingress.kubernetes.io/listen-ports: '[{"HTTP": 80}, {"HTTPS":443}]'
alb.ingress.kubernetes.io/group.name: my-k8s-alb
alb.ingress.kubernetes.io/group.order: "5"
alb.ingress.kubernetes.io/load-balancer-name: my-k8s-alb
spec:
ingressClassName: alb
rules:
- host: ytyng.com
http:
paths:
- pathType: ImplementationSpecific
backend:
service:
name: redirect-to-eks
port:
name: use-annotation
```
マニフェストを Apply したら、ALB のリスナールールを確認するのと、EKS のクラスター → リソース → リソースタイプ → サービスとネットワーキング → イングレス → このマニフェストの名前 の箇所を見て、イベントのログを確認する。Django5にして依存ライブラリも更新したら、メール送信で SSL: CERTIFICATE_VERIFY_FAILED エラーが出るようになった2024-04-15T08:35:38+00:002024-07-27T09:54:22+00:00ytynghttps://www.ytyng.com/blog/author/ytyng/https://www.ytyng.com/blog/django-send-mail-ssl-unverified-error/# 問題の内容
Django を 5.0 にアップデートし、他のライブラリも更新した所、下記のメール送信のコードを実行した所
```python
message = EmailMessage(
subject='検証用メール',
body='検証用のメールを送信しています。無視してください。',
from_email='developer@example.com',
to=['test-user@example.com'],
reply_to=['developer@example.com'],
)
send_result = message.send()
```
下記のようなエラーメッセージが出た。
```
Traceback (most recent call last):
File "<...>python3.11/site-packages/django/core/management/base.py", line 413, in run_from_argv
self.execute(*args, **cmd_options)
File "<...>python3.11/site-packages/django/core/management/base.py", line 459, in execute
output = self.handle(*args, **options)
^^^^^^^^^^^^^^^^^^^^^^^^^^^^^
File "<...>management/commands/send_test_mail.py", line 34, in handle
send_result = message.send()
^^^^^^^^^^^^^^
File "<...>python3.11/site-packages/django/core/mail/message.py", line 300, in send
return self.get_connection(fail_silently).send_messages([self])
^^^^^^^^^^^^^^^^^^^^^^^^^^^^^^^^^^^^^^^^^^^^^^^^^^^^^^^^
File "<...>python3.11/site-packages/django/core/mail/backends/smtp.py", line 128, in send_messages
new_conn_created = self.open()
^^^^^^^^^^^
File "<...>python3.11/site-packages/django/core/mail/backends/smtp.py", line 93, in open
self.connection.starttls(context=self.ssl_context)
File "<...>lib/python3.11/smtplib.py", line 790, in starttls
self.sock = context.wrap_socket(self.sock,
^^^^^^^^^^^^^^^^^^^^^^^^^^^^^^
File "<...>lib/python3.11/ssl.py", line 517, in wrap_socket
return self.sslsocket_class._create(
^^^^^^^^^^^^^^^^^^^^^^^^^^^^^
File "<...>lib/python3.11/ssl.py", line 1108, in _create
self.do_handshake()
File "<...>lib/python3.11/ssl.py", line 1379, in do_handshake
self._sslobj.do_handshake()
ssl.SSLCertVerificationError: [SSL: CERTIFICATE_VERIFY_FAILED] certificate verify failed: self-signed certificate (_ssl.c:1006)
```
接続先のSMTPサーバーは、EC2 に Postfix をインストールして作ったもの。
自己署名証明書がベリファイできないとこのエラーが出るようになってしまったようだ。
## smtplib を使ってメール送信をした場合
ちなみに、同サーバーを使う際、
smtplib を使って
```python
s = smtplib.SMTP(...)
s.starttls()
s.ehlo()
s.login(...)
s.sendmail(...)
```
とした場合、上記エラーは出なかった。
## 対応案
とりいそぎの対応として、[メール送信箇所のコード](https://github.com/django/django/blob/main/django/core/mail/backends/smtp.py#L93
)の下記箇所について
```pythjon
self.connection.starttls(context=self.ssl_context)
```
`context` に、 `ssl._create_unverified_context()` を入れれば動く。(本来は `ssl.create_default_context()` を入れている)
証明書のベリファイをスキップするので良い方法ではない。
## 緊急的な対応方法
例えば、下記のような関数を作り、`EmailMessage.send` の代わりに使えば、警告とベリファイをキャンセルして送信ができる。
```python
def send_message_use_unverified_backend(email_message, *, fail_silently=False):
if not email_message.recipients():
return 0
connection = email_message.get_connection(fail_silently=fail_silently)
connection.ssl_context = ssl._create_unverified_context()
return connection.send_messages([email_message])
message = EmailMessage(...)
send_message_use_unverified_backend(message)
```
本来は、上記対応よりも Amazon SES とか Sendgrid 等のマネージドな SMTP を使ったほうが良い。Django の ユニットテストの assertEqual の引数の first, second は実際は expected, actual2024-03-28T00:41:49+00:002024-07-27T09:20:32+00:00ytynghttps://www.ytyng.com/blog/author/ytyng/https://www.ytyng.com/blog/django-unittest-expected-actual/Django のユニットテストの assertEqual メソッドを見てみると、
```python
def assertEqual(self, first, second, msg=None):
"""Fail if the two objects are unequal as determined by the '=='
operator.
"""
assertion_func = self._getAssertEqualityFunc(first, second)
assertion_func(first, second, msg=msg)
```
第一引数は first, 第二引数が second と命名されており、それぞれの変数に用途の違いは無いように見える。
ただし、下記のようなコードを書いて
```python
from django.test import TestCase
class AssertTest(TestCase):
def test_assert_equal(self):
self.assertEqual(
'expected',
'actual'
)
```
実際にテストが失敗すると、結果に
```
Failure
Expected :'expected'
Actual :'actual'
```
と出力されるので、第一引数が Expected, 第二引数が Actual だと思うべきです。
そのため、ユニットテストにハードコーディングする値は Expected なので第一引数、
メソッド実行結果や結果の変数は Acutal なので 第二引数になる。
```python
self.assertEqual(
110,
get_tax_included_price(100)
)
```
にもかかわらず、実際の Django のユニットテストの例を見ると逆なので、実態としてどっちでも良い。
本当は [Black](https://github.com/psf/black) あたりがどっちかに決めてくれると良いと思う。pipenv install で AttributeError: module 'pkgutil' has no attribute 'ImpImporter'. Did you mean: 'zipimporter'? が出た → まずは pipenv の python バージョンを確認2024-03-24T04:53:50+00:002024-07-27T09:31:25+00:00ytynghttps://www.ytyng.com/blog/author/ytyng/https://www.ytyng.com/blog/python-pipenv-attributeerror-pkgutil-impimporter-zipimporter/Python3.12 環境を構築するため、Pipenv で仮想環境を新しく構築している際、`pipenv install` をした時に下記のエラーが出た。
```
Traceback (most recent call last):
File "<my-env>/.venv/bin/pip", line 5, in <module>
from pip._internal.cli.main import main
File "<my-env>/.venv/lib/python3.12/site-packages/pip/_internal/cli/main.py", line 9, in <module>
from pip._internal.cli.autocompletion import autocomplete
File "<my-env>/.venv/lib/python3.12/site-packages/pip/_internal/cli/autocompletion.py", line 10, in <module>
from pip._internal.cli.main_parser import create_main_parser
File "<my-env>/.venv/lib/python3.12/site-packages/pip/_internal/cli/main_parser.py", line 8, in <module>
from pip._internal.cli import cmdoptions
File "<my-env>/.venv/lib/python3.12/site-packages/pip/_internal/cli/cmdoptions.py", line 23, in <module>
from pip._internal.cli.parser import ConfigOptionParser
File "<my-env>/.venv/lib/python3.12/site-packages/pip/_internal/cli/parser.py", line 12, in <module>
from pip._internal.configuration import Configuration, ConfigurationError
File "<my-env>/.venv/lib/python3.12/site-packages/pip/_internal/configuration.py", line 20, in <module>
from pip._internal.exceptions import (
File "<my-env>/.venv/lib/python3.12/site-packages/pip/_internal/exceptions.py", line 7, in <module>
from pip._vendor.pkg_resources import Distribution
File "<my-env>/.venv/lib/python3.12/site-packages/pip/_vendor/pkg_resources/__init__.py", line 2164, in <module>
register_finder(pkgutil.ImpImporter, find_on_path)
^^^^^^^^^^^^^^^^^^^
AttributeError: module 'pkgutil' has no attribute 'ImpImporter'. Did you mean: 'zipimporter'?
```
この場合、おそらく
```shell
% python3 -m ensurepip --upgrade
```
をすれば解決する。システムグローバルの python 環境と仮想環境内で両方やっておいたほうが良い。
ただ、そもそも pipenv の環境がおかしかったので pipenv の作り直しをした。
# システム環境の確認
## python3 のデフォルトバージョンの確認 (Mac)
仮想環境(venv)に入っていない状態で
```shell
% which python3
/opt/homebrew/bin/python3
% python3 --version
Python 3.11.6
```
`/opt/homebrew/bin/python3` が使われ、 python3.11 だった。
## pipenv の使用する python のバージョンの確認
仮想環境(venv)に入っていない状態で
```shell
% which pipenv
/opt/homebrew/bin/pipenv
% head /opt/homebrew/bin/pipenv
#!/opt/homebrew/opt/python@3.9/bin/python3.9
# -*- coding: utf-8 -*-
import re
import sys
from pipenv import cli
...
```
pipenv は python3.9 を使うようになっていた。
pipen が使う python3 と、デフォルトの python バージョンが違っていて面倒が発生しそうなのでで、pipenv でデフォルトの python3.11 を使うようにする。
# システムグローバルの pipenv の再インストール
## homebrew でアンインストールしてみる
```shell
% brew uninstall pipenv
Error: No such keg: /opt/homebrew/Cellar/pipenv
```
homebrew でインストールされてるものではなかった
## ファイルを消す
おそらく、python3.9 の pip でインストールされていると考えられる。
後から考えれば、
```shell
% /opt/homebrew/opt/python@3.9/bin/python3.9 -m pip uninstall pipenv
```
するときれいにアンインストールできたのかもしれないが、どうせこの後 Python3.11 環境で作り直されると思ったので、雑に rm した。
```shell
% rm /opt/homebrew/bin/pipenv
```
## システムグローバル環境のデフォルトのpython3 で pipenv をインストールしなおす
```shell
% python3 -m pip install pipenv
```
## インストール結果の確認
```shell
% which pipenv
/opt/homebrew/bin/pipenv
```
さきほど削除したファイルが再生成されている。期待通り。
```shell
% head /opt/homebrew/bin/pipenv
#!/opt/homebrew/opt/python@3.11/bin/python3.11
# -*- coding: utf-8 -*-
import re
import sys
from pipenv import cli
...
```
python3.11 を使うようになっていた。期待通り。
## 念の為 システムグローバルの python 環境で ensurepip upgrade しておく
```shell
% python3 -m ensurepip --upgrade
```
# 仮想環境の構築
python3.12 環境の pipenv 環境構築の覚書
### Pipflie
```
[[source]]
name = "pypi"
url = "https://pypi.org/simple"
verify_ssl = true
[dev-packages]
[packages]
[requires]
python_version = "3.12"
```
このファイルを作ってから
```shell
% python3 -m pipenv install
```
※ `head $(which pipenv)` の1行目(shebang)が `which python3` の結果の python のパスと一致している限り、
```shell
% pipenv install
```
でも同じ。
## 仮想環境内に入る
```shell
% python3 -m pipenv shell
```
## 仮想環境内での pip のテスト
仮想環境内で、
```shell
python3 -m pip freeze
```
とか
```shell
pip freeze
```
をしてみて、エラーが出ないかを確認する。
もし、
```
File "<my-env>/.venv/lib/python3.12/site-packages/pip/_internal/cli/main_parser.py", line 8, in <module>
from pip._internal.cli import cmdoptions
File "<my-env>/.venv/lib/python3.12/site-packages/pip/_internal/cli/cmdoptions.py", line 23, in <module>
from pip._internal.cli.parser import ConfigOptionParser
File "<my-env>/.venv/lib/python3.12/site-packages/pip/_internal/cli/parser.py", line 12, in <module>
from pip._internal.configuration import Configuration, ConfigurationError
File "<my-env>/.venv/lib/python3.12/site-packages/pip/_internal/configuration.py", line 20, in <module>
from pip._internal.exceptions import (
File "<my-env>/.venv/lib/python3.12/site-packages/pip/_internal/exceptions.py", line 7, in <module>
from pip._vendor.pkg_resources import Distribution
File "<my-env>/.venv/lib/python3.12/site-packages/pip/_vendor/pkg_resources/__init__.py", line 2164, in <module>
register_finder(pkgutil.ImpImporter, find_on_path)
^^^^^^^^^^^^^^^^^^^
AttributeError: module 'pkgutil' has no attribute 'ImpImporter'. Did you mean: 'zipimporter'?
```
このエラーが出るなら、仮想環境に入っている状態で
```shell
% python3 -m ensurepip --upgrade
```
をしてみる。</module></my-env></module></my-env></module></my-env></module></my-env></module></my-env></module></my-env></module></my-env></module></my-env></module></my-env></module></my-env></module></my-env></module></my-env></module></my-env></module></my-env></module></my-env>Kubernetes Ingress で任意のレスポンスヘッダーを返す2024-02-23T03:38:57+00:002024-07-27T10:03:35+00:00ytynghttps://www.ytyng.com/blog/author/ytyng/https://www.ytyng.com/blog/kubernetes-ingress-add-response-header/Kubernetes の Nginx Ingress で任意のレスポンスヘッダーを返す方法。
複数の Ingress があってどれが反応しているか確認したい時に使う。
```yaml
apiVersion: networking.k8s.io/v1
kind: Ingress
metadata:
name: ...
namespace: ...
annotations:
nginx.ingress.kubernetes.io/configuration-snippet: |
more_set_headers "X-Ingress-Name: my-awesome-ingress";
more_set_headers "X-Other-header: other-header";
spec:
```Kubernetes Ingress でパスのリライトをする2024-01-01T04:50:47+00:002024-07-25T23:08:49+00:00ytynghttps://www.ytyng.com/blog/author/ytyng/https://www.ytyng.com/blog/kubernetes-ingress-%E3%81%A7%E3%83%91%E3%82%B9%E3%81%AE%E3%83%AA%E3%83%A9%E3%82%A4%E3%83%88%E3%82%92%E3%81%99%E3%82%8B/`rules`.`http`.`paths`.`path` で正規表現でマッチさせたものが
`metadata`.`annotations`.`nginx.ingress.kubernetes.io/rewrite-target` に入ります。
```yaml
apiVersion: networking.k8s.io/v1
kind: Ingress
metadata:
name: my-ingress
namespace: my-namespace
annotations:
ingress.kubernetes.io/ssl-redirect: "true"
nginx.ingress.kubernetes.io/rewrite-target: /api/apppath/$1
spec:
tls:
- secretName: my-http-cert
rules:
- host: log.ytyng.com
http:
paths:
- path: /(.*)
pathType: Prefix
backend:
service:
name: my-service-service
port:
number: 8000
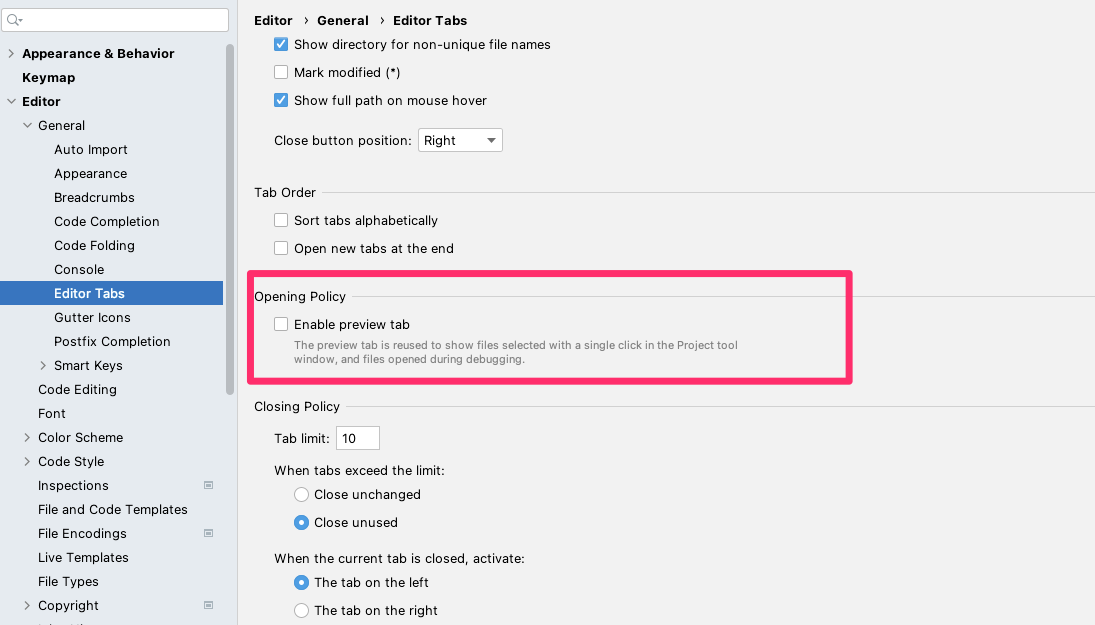
```PyCharm (およびそのほかの JetBrains のエディター) で、フォルダツリー(Project View) でシングルクリックでファイルが開かれるようになったのをダブルクリックに戻す設定2023-12-31T06:02:48+00:002024-07-26T16:41:29+00:00ytynghttps://www.ytyng.com/blog/author/ytyng/https://www.ytyng.com/blog/pycharm-jetbrains-editor-no-single-click-open-file-in-folder-tree-project-view/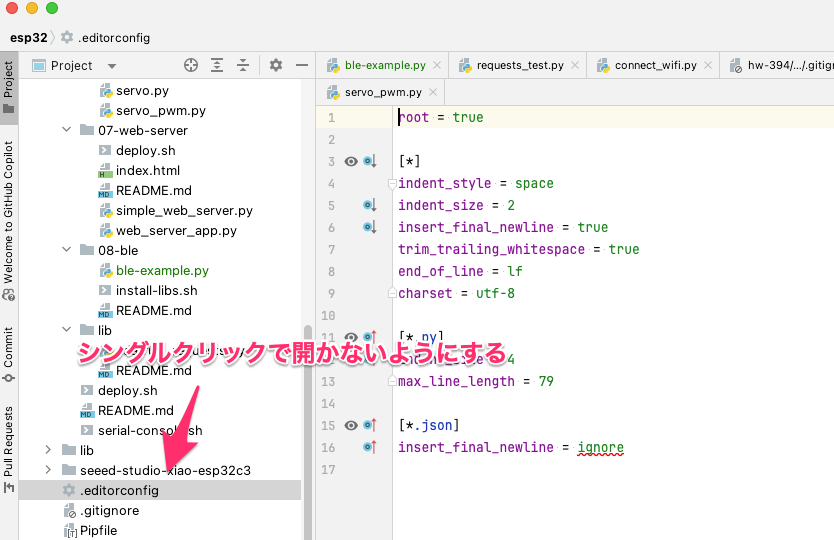
Preferences → Editor → General → Editor Tabs → Opening policy → Enable preview tabs
を無効にする
デフォルトで有効になるようになったっぽい。
[How to disable single-click "open file" from Project view – IDEs Support (IntelliJ Platform) | JetBrains](https://intellij-support.jetbrains.com/hc/en-us/community/posts/9020214641554-How-to-disable-single-click-open-file-from-Project-view)HW-394 と書いてある ESP-WROOM-32 (ESP32) 開発ボードで CircuitPython をする2023-12-24T09:20:13+00:002024-07-27T05:03:39+00:00ytynghttps://www.ytyng.com/blog/author/ytyng/https://www.ytyng.com/blog/esp32-hw-394-wroom-32-circuit-python/AliExpress で、ESP32 で検索すると出てくる ESP-WROOM-32 搭載の開発ボードで、[基盤に「HW-394」と書いてあるもの](https://www.aliexpress.com/item/1005005495948290.html)を買いました。
4個入で16ドルでした。

USBシリアルコンソールのチップで CH340C が実装されているものです。[HW-394 という印字が無く、パターンが同じタイプ](https://www.aliexpress.com/item/1005005335283537.html)もあるようです。
日本の Amazon でも、ESP-WROOM-32 + CH340C (もしくは別のシリアルコンソールチップ)の(謎メーカーの)同等商品が数多く売られていました。
HW-394 という印字が開発ボードの名前かどうかもわかりませんが、正式名称がわからないため、今後、この製品は HW-394 と呼びます。
後記:
後からわかったのですが、ESP32 DevKitC という規格でいろんなメーカーが作っているらしい
# 選定にあたっての注意
アリエク以外で売ってないですし、型番で検索しても公式ページなどは無いので怪しい商品です。
よく使う小さめのブレッドボードを使った時、基盤が大きすぎるため片側のピンしかアクセスできません。
そのためかなりおすすめしません。
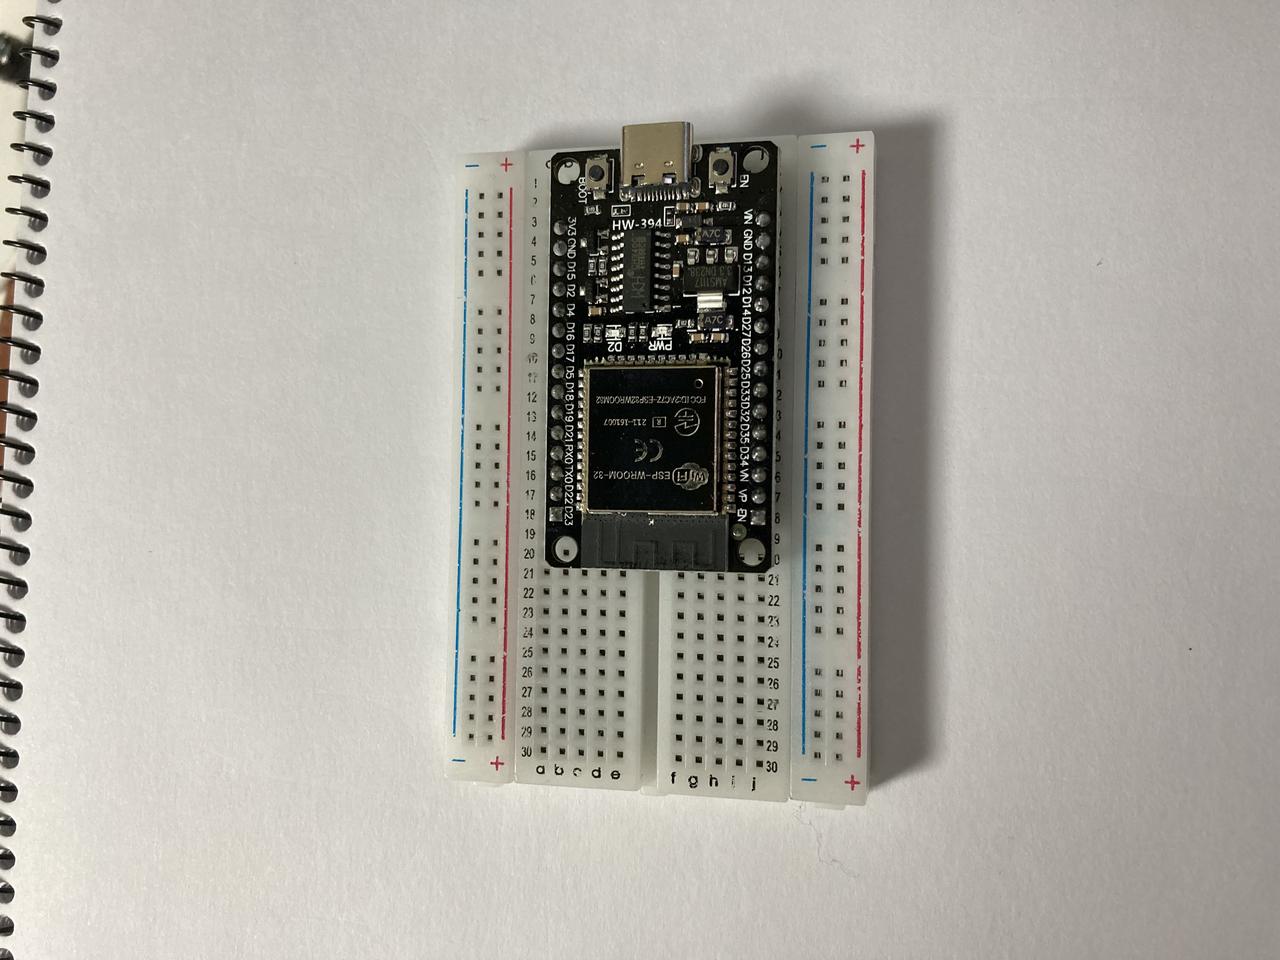
(写真では見えにくいですが、左側のピンしか使えません)
ESP32を使う場合、この商品は使わずに、CircuitPython の公式サイトで「ESP32」で検索すると出てくるボードを買うのが良いと思います。
https://circuitpython.org/downloads?q=ESP32
[Seeed Studio XIAO ESP32C3](https://circuitpython.org/board/seeed_xiao_esp32c3/) が、日本でも入手しやすく比較的安価で小さくて良いと思います。
# 開発方法
Mac (Apple Silicon M2) を使って開発します。
ESP32 は、USBシリアル接続を使わずに、ブラウザを使ってファイルを転送したりブラウザ内で開発したりできるようですが、今回はそれは行いません。Python ファイルの転送も USB シリアルポート経由で行います。
PyCharm でコードを書いて、シェルスクリプトでフラッシュの書き込みを行います。
# USB シリアルの接続ポートを確認する
HW-394 を Mac に USB-C-C のケーブルで接続します。
ドライバのインストール等は不要です。
接続後、以下のコマンドでポートを確認します。
```shell
python -m serial.tools.list_ports
```
結果
```
/dev/cu.Bluetooth-Incoming-Port
/dev/cu.usbserial-110
2 ports found
```
`Bluetooth-Incoming-Port` は除外し、検出された `/dev/cu.usbserial-110` が、今回作られた USB シリアルポートです。
ここで、シリアルポートが見えないようであれば、ケーブルを変えて、ハブを通さず直接接続したほうが良いです。途中で USB ハブをはさんでいるとうまく認識されないことがあります。
シェルスクリプト内でポートを扱う際、110 という数字は変動しそうなので、シェルスクリプトから取得する場合は私はこんな感じで探すようにしています。
```shell
port=$(ls -1 /dev/cu.usbserial* |head -n 1)
```
# CircuitPython のファームウェアを書き込む
RP2040(RaspberryPi Pico 等) のように、uf2 をドラッグアンドドロップして書き込むことはできません。ESP32はストレージデバイスとして認識されないためです。
ファームウェア書き込みのために、esptool というライブラリを使います。
## esptool のインストール方法
```shell
python3 -m pip install esptool
```
Pipenv を使う場合、以下のような Pipfile が良いと思います。
#### Pipfile
```
[[source]]
name = "pypi"
url = "https://pypi.org/simple"
verify_ssl = true
[dev-packages]
[packages]
esptool = "*"
# 不具合を修正したフォークを使う
adafruit-ampy = {git = "git+ssh://git@github.com/ytyng/ampy.git"}
[requires]
python_version = "3.9"
```
```shell
pipenv install
```
adafruit-ampy については後ほど説明します。ファイルの転送に使います。
## CircuitPython のファームウェアの取得
HW-394 用の CircuitPython のファームウェアは用意されていません。そのため、構成の似ている
[DOIT ESP32 Development Board](https://circuitpython.org/board/doit_esp32_devkit_v1/) のファームウェアを使います。
本来の製品用のものではないため、自己責任での使用をお願いします。
[上記ページ](https://circuitpython.org/board/doit_esp32_devkit_v1/)から DOWNLOAD .BIN NOW を押して、ダウンロードします。
## ファームウェアの書き込み
esptool の `write_flash` を使って書き込みます。
```shell
#!/usr/bin/env zsh
port=$(ls -1 /dev/cu.usbserial* |head -n 1)
esptool.py --chip esp32 --port $port \
--before default_reset --after hard_reset --no-stub \
write_flash --flash_mode dio 0x0 \
adafruit-circuitpython-doit_esp32_devkit_v1-en_US-8.2.9.bin
```
# Python の REPL に接続する
シリアルポートに接続することで、ボード上の Python コンソール (REPL) が使えます。
screen コマンドで接続します。
```shell
#!/usr/bin/env zsh
port=$(ls -1 /dev/cu.usbserial* |head -n 1)
screen $port 115200
```
```
Adafruit CircuitPython 8.2.9 on 2023-12-06; ESP32 Devkit V1 with ESP32
>>> import board
>>> dir(board)
['__class__', '__name__', 'D1', 'D12', 'D13', 'D14', 'D15', 'D16', 'D17', 'D18', 'D19', 'D2', 'D21', 'D22', 'D23', 'D25', 'D26', 'D27', 'D3', 'D32', 'D33', 'D34', 'D35', 'D4', 'D5', 'I2C', 'LED', 'MISO', 'MOSI', 'RX', 'RX0', 'RX2', 'SCK', 'SCL', 'SDA', 'SPI', 'TX', 'TX0', 'TX2', 'UART', 'VN', 'VP', 'board_id']
```
# Mac で書いた Python コードをフラッシュに書き込む
シリアルポートからファイルを書き込むには、 [rshell](https://github.com/dhylands/rshell) ,[mpfshell](https://github.com/wendlers/mpfshell), [ampy](https://pypi.org/project/adafruit-ampy/), および [upydev](https://pypi.org/project/upydev/0.0.9/) といったツールが使えそうですが、どれも開発ボードが MicroPython でないと使えないようです。
例えば、MicroPython では ubinascii というモジュール名なのが、CircuitPython では binascii となっていたりと、モジュール名が違うものがいくつかあるため、MicroPython 用のライブラリはそのまま CircuitPython では使えない場合が多いです。多くは、MicroPython 用のものは先頭に「u」がつく場合が多いです。
この中では ampy が一番シンプルなツールで CircuitPython への対応が容易そうなのでフォークして修正して使いました。本家では既にプルリクエストが上がっていますが、メンテが放置されているらしくマージされていません。
[修正済みampy](https://github.com/ytyng/ampy)
## 修正済みの ampy をインストールする
上で書いた Pipfile でインストールするか、
```shell
python3 -m pip install git+https://github.com/ytyng/ampy.git
```
でインストールしてください。
## Python コードを書く
基盤に実装されている D2 LEDを点滅させるスクリプトを書きます。
### blink_led_d2.py
```
import digitalio
import time
import board
print('brink_led.py loaded.')
led_pin = digitalio.DigitalInOut(board.D2)
led_pin.direction = digitalio.Direction.OUTPUT
while True:
led_pin.value = True
time.sleep(0.1)
led_pin.value = False
time.sleep(1.9)
```
## フラッシュに書き込む
### deploy.sh
```shell
#!/usr/bin/env zsh
export AMPY_PORT=$(ls -1 /dev/cu.usbserial* |head -n 1)
cd $(dirname $0)
ampy put blink_led_d21.py /code.py
```
フラッシュの `/code.py` としてコピーしした後、EN と書いてある基板上のボタン(リセットボタン)を押すと実行され、Lチカします。

ピン番号を変更することで、他のピンでもLチカできることを確認しました。
mac で、コマンドラインからChrome をウインドウサイズを指定して特定のURLを開く方法2023-12-12T00:22:07+00:002024-07-27T05:38:22+00:00ytynghttps://www.ytyng.com/blog/author/ytyng/https://www.ytyng.com/blog/mac-chrome-open-from-commandline-fixed-size/mac で、コマンドラインからウインドウサイズを指定して Chrome を開く方法です。
メモの Webアプリ等をランチャーから起動する場合に便利です。
```shell
open -na "Google Chrome" --args --new-window --app="data:text/html,<html><body><script>window.moveTo(0,0);window.resizeTo(500,800);window.location='https://www.example.com';</script></body></html>"
```
### 参考
[bash - Launch Google Chrome from the command line with specific window coordinates - Stack Overflow](https://stackoverflow.com/questions/13436855/launch-google-chrome-from-the-command-line-with-specific-window-coordinates)Raspberry PI Pico や RP2040 に Mac OS Sonoma でファイルをコピーすると Input/output error になる場合2023-11-21T02:51:56+00:002024-07-27T10:09:20+00:00ytynghttps://www.ytyng.com/blog/author/ytyng/https://www.ytyng.com/blog/raspberry-pi-pico-rp2040-mac-os-sonoma-copy-input-output-error/# 問題
Mac OS Sononoma で、 Rasberry PI Pico や RP2040 を載せてるマイコンボードの開発をしようとして、
ファイルを RP2040 にコピーした時に、
```
cp: code.py: could not copy extended attributes to /Volumes/CIRCUITPY/code.py: Input/output error
```
となって 0バイトでコピーされる。(中身がコピーされていない)
また、Finder でドラッグアンドドロップした場合は
```
The Finder can’t complete the operation because some data in “” can’t be read or written.
(Error code -36)
```
のエラーダイアログが表示される。
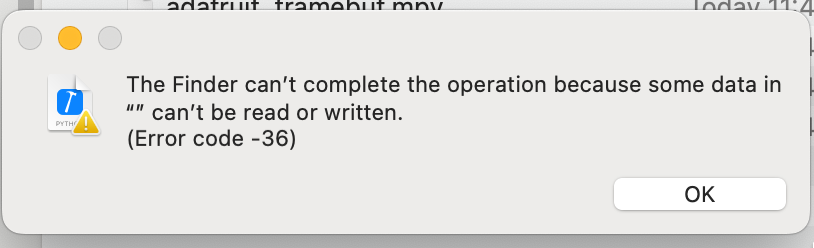
# 解決方法
ボリュームを synchronous でマウントしなおせば良い。
以下のスクリプトでマウントしなおしができる
```shell
#!/usr/bin/env zsh
m=$(mount | grep /Volumes/CIRCUITPY | grep synchronous)
if [ ! "$m" ]; then
devname=$(df | grep CIRCUITPY | cut -d" " -f1)
sudo umount /Volumes/CIRCUITPY
sudo mkdir /Volumes/CIRCUITPY
sleep 2
sudo mount -v -o sync -t msdos $devname /Volumes/CIRCUITPY
fi
```
# 参考情報
[OSError: [Errno 5] Input/output: macOS Sonoma is delaying writes on small filesystems · Issue #8449 · adafruit/circuitpython](https://github.com/adafruit/circuitpython/issues/8449)
# 原因
Sonoma では、ファイルのコピーをする際、まず仮想ファイルを作って、ファイルシステムへのページアウトがトリガーされる。
非同期でマウントされている場合、FAT とメタデータへの更新はフラッシュされるまで遅延されるため、0バイトファイルとなる。
8MB以下、FAT16、uf2、Python ファイルの書き込み の条件下で問題となる。
https://github.com/adafruit/circuitpython/issues/8449#issuecomment-1745372269
# 私の解決策
下記のようなデプロイスクリプトを作りました。
## remount.sh
```shell
#!/usr/bin/env zsh
ret=$(mount | grep /Volumes/CIRCUITPY | grep synchronous)
if [ ! "$ret" ]; then
devname=$(df | grep CIRCUITPY | cut -d" " -f1)
sudo umount /Volumes/CIRCUITPY
sudo mkdir /Volumes/CIRCUITPY
sleep 2
sudo mount -v -o sync -t msdos $devname /Volumes/CIRCUITPY
fi
```
## deploy.sh
```shell
#!/usr/bin/env zsh
cd $(dirname $0)
# Sonoma以降、ファイルのコピーで Input/output error になる問題の対応
./remount.sh
files=(
file_1.py
file_2.py
)
for file in $files; do
echo $file
cp $file /Volumes/CIRCUITPY/
done
# ゴミファイルを消す
dot_clean /Volumes/CIRCUITPY
ls -lhatr /Volumes/CIRCUITPY
```Python の MySQLdb を使う時に symbol not found in flat namespace '_mysql_affected_rows' が出た場合の対応2023-11-09T03:39:23+00:002024-07-27T10:36:56+00:00ytynghttps://www.ytyng.com/blog/author/ytyng/https://www.ytyng.com/blog/python3-symbol-not-found-in-flat-namespace-_mysql_affected_rows/Apple silicon の Python で MySQL を操作しようとして
```
ImportError: dlopen(/.../site-packages/MySQLdb/_mysql.cpython-310-darwin.so, 0x0002): symbol not found in flat namespace '_mysql_affected_rows'
```
が出た。
[Macos M1 mysqlclient Symbol not found: _mysql_affected_rows ERROR · Issue #496 · PyMySQL/mysqlclient](https://github.com/PyMySQL/mysqlclient/issues/496#issuecomment-1614688099)
上記のコメントを参考にする。
私の環境では
```shell
% echo $MYSQLCLIENT_LDFLAGS
-L/opt/homebrew/opt/openssl/lib -L/opt/homebrew/opt/mysql/lib -L/opt/homebrew/opt/zlib/lib -L/opt/homebrew/lib
```
となっていたので、
```shell
% echo $MYSQLCLIENT_LDFLAGS
-L/opt/homebrew/opt/openssl/lib -L/opt/homebrew/opt/mysql/lib -L/opt/homebrew/opt/zlib/lib -L/opt/homebrew/lib -lmysqlclient -rpath /opt/homebrew/opt/mysql/lib
```
となるように修正した。
その後、
```shell
pip uninstall mysqlclient
pip cache purge
pip install mysqlclient
```
を行った。
```shell
python3
>>> import MySQLdb
>>>
```
でエラーが出なければOKDjango のログインユーザーを django shell を使って切り替える2023-10-12T12:41:35+00:002024-07-27T05:50:56+00:00ytynghttps://www.ytyng.com/blog/author/ytyng/https://www.ytyng.com/blog/django-change-user-on-session/問い合わせ対応などで、他のユーザーとして強制的なログインを行う方法。
操作を間違えたり、他のユーザーとしてログインしたまま放置して操作を間違えると危険なので、使用には十分注意すること。本番環境で行ってはいけません。
この操作方法を行って発生した影響・損害・問題に対して著者は一切の責任を負いません。
1. まず、ブラウザで Django のアプリにログインする
2. クッキーの session_id を記録しておく
3. サーバで ./manage.py shell を実行する
```python
# 自分の session_id
session_id = 'abcd1234xxxxxxxxxxxxxxxxxxxxxxxxxxxxxxxxx'
# 代わりたいユーザーのID
user_id = 1
from django.conf import settings
from user.models import User
engine = __import__(settings.SESSION_ENGINE, {}, {}, [''])
session = engine.SessionStore(session_id)
dict(session) # 自分のユーザーIDか確認
user = User.objects.get(id=user_id)
user # 内容確認
session['_auth_user_id'] = user.id
session['_auth_user_hash'] = user.get_session_auth_hash()
session.save()
```
ブラウザをリロードすればユーザーが変わっている。
確認作業が終わったら、事故らないようクッキーの消去と正規ユーザーでの再ログインをしておく。Kubernetes で他の Pod と通信する2023-10-07T09:46:45+00:002024-07-26T16:49:37+00:00ytynghttps://www.ytyng.com/blog/author/ytyng/https://www.ytyng.com/blog/kubernetes-name-resolv-dns-another-pod/同じ namespace 内であれば、 Service の `metadata.name` で名前解決ができる。
## Service
```yaml
apiVersion: v1
kind: Service
metadata:
name: redis
namespace: airflow
spec:
ports:
- name: "6379"
port: 6379
targetPort: 6379
```
とすると、他の Pod から `redis` で名前解決できる。
```
redis://:@redis:6379/0
```
同様に
```yaml
apiVersion: v1
kind: Service
metadata:
name: postgres
namespace: airflow
spec:
ports:
- name: "5432"
port: 5432
targetPort: 5432
```
とすれば
```
db+postgresql://username:password@postgres/airflow
postgresql+psycopg2://username:password@postgres/airflow
```
とできる